Pulumi supports using self-managed backends for storing infrastructure state. Let’s see how we can solve the Chicken and Egg problem: create infrastructure for an AWS self-managed backend for Pulumi (and with Pulumi).
The goal is to create the following AWS resources via Pulumi:
- S3 Bucket: use as Pulumi Backend for storing Pulumi state files
- KMS key: use as Pulumi Encryption Provider for encrypting secrets
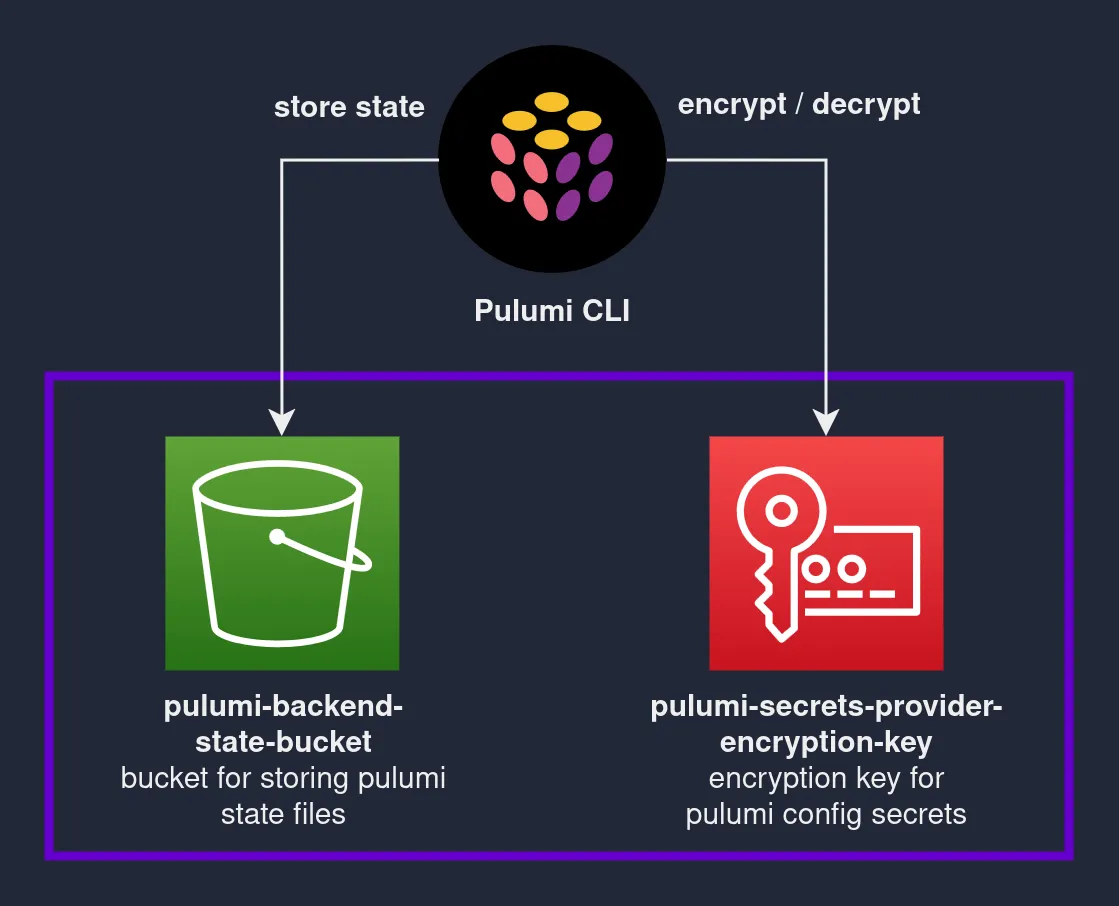
Table of contents
Open Table of contents
Prerequisites
- Install Pulumi
- Install Python 3.7+
- Configure AWS Credentials with access to AWS S3 / KMS services.
Bootstrap and deploy backend
Step 1: Create a new Pulumi project
Create a new directory pulumi-backend-bootstrap, and open it in your terminal. Add the following files:
Pulumi.yaml
name: pulumi-backend-bootstrap
runtime:
  name: python
  options:
    virtualenv: venv
description: Create resources for setting up a self-managed pulumi backend
The above file defines the Pulumi project metadata.
requirements.txt
pulumi==3.40.2
pulumi-aws==5.16.0
main.py
import json
import pulumi
import pulumi_aws as aws

# create S3 bucket for storing pulumi state
pulumi_backend_state_bucket = aws.s3.Bucket(
    "pulumi-backend-state-bucket",
    acl="private",
    versioning=aws.s3.BucketVersioningArgs(enabled=True),
    server_side_encryption_configuration=aws.s3.BucketServerSideEncryptionConfigurationArgs(
        rule=aws.s3.BucketServerSideEncryptionConfigurationRuleArgs(
            apply_server_side_encryption_by_default=aws.s3.BucketServerSideEncryptionConfigurationRuleApplyServerSideEncryptionByDefaultArgs(
                sse_algorithm="AES256"
            )
        )
    ),
)

# block all public access for the bucket
aws.s3.BucketPublicAccessBlock(
    "pulumi-backend-state-bucket-public-access-block",
    bucket=pulumi_backend_state_bucket.id,
    block_public_acls=True,
    block_public_policy=True,
    ignore_public_acls=True,
    restrict_public_buckets=True,
)


aws_account_id = aws.get_caller_identity().account_id
pulumi_secrets_provider_encryption_key = aws.kms.Key(
    "pulumi-secrets-provider-encryption-key",
    deletion_window_in_days=10,
    policy=json.dumps(
        {
            "Version": "2012-10-17",
            "Statement": [
                # policy which gives the AWS account that owns the KMS key full access to the KMS key
                {
                    "Sid": "Enable IAM policies",
                    "Effect": "Allow",
                    "Action": "kms:*",
                    "Principal": {"AWS": [f"arn:aws:iam::{aws_account_id}:root"]},
                    "Resource": "*",
                },
            ],
        }
    ),
)

pulumi.export(
    "PULUMI_BACKEND_URL", pulumi_backend_state_bucket.id.apply(lambda v: f"s3://{v}")
)
pulumi.export(
    "Pulumi Backend Login Command",
    pulumi_backend_state_bucket.id.apply(lambda v: f"pulumi login s3://{v}"),
)

pulumi.export(
    "PULUMI_SECRETS_PROVIDER",
    pulumi_secrets_provider_encryption_key.key_id.apply(lambda v: f"awskms:///{v}"),
)
pulumi.export(
    "Pulumi Stack Init Command",
    pulumi_secrets_provider_encryption_key.key_id.apply(
        lambda v: f"pulumi stack init --secrets-provider='awskms:///{v}' <project-name>.<stack-name>"
    ),
)
The above code will create an S3 bucket and a KMS key. The S3 bucket has versioning enabled and public access blocked. The KMS key has a default key policy allowing the AWS account that owns the KMS key full access to the KMS key.
Step 2: Configure Pulumi backend
All Pulumi programs need a backend for storing infrastructure state. This is the Chicken and Egg problem alluded to earlier, where we need to use some backend to provision our self-managed backend. Luckily for us, Pulumi supports using the local filesystem as a backend.
$> pulumi login --local
Logged in to **** as **** (file://~)
Step 3: Initialize Pulumi stack
Run the command below in your terminal for initializing the stack. You will be prompted to enter a passphrase to encrypt any config/secrets set in the stack config file as we haven’t set any secrets provider.
$> pulumi stack init dev
Created stack 'dev'
Enter your passphrase to protect config/secrets:
Re-enter your passphrase to confirm:
$> pulumi stack ls
NAME  LAST UPDATE  RESOURCE COUNT
dev*  n/a          n/a
Your file structure should now look something like this:
$> ls
__main__.py  Pulumi.dev.yaml  Pulumi.yaml  requirements.txt
Step 4: Set your AWS region
You should configure the AWS region you would like to use. Running the Pulumi program will create all resources in this AWS region.
$> pulumi config set aws:region eu-central-1
$> cat Pulumi.dev.yaml
encryptionsalt: v1:xxxxxxxxxxxxxxxxxxxxxxxxxxxxxxx
config:
  aws:region: eu-central-1
Step 5: Deploy the stack
Run the command below for deploying the stack. Pulumi will create a virtualenv venv in the current directory, install all the packages as specified in requirements.txt. A preview will then be shown and deployment will proceed once confirmed.
$> pulumi up
Enter your passphrase to unlock config/secrets
    (set PULUMI_CONFIG_PASSPHRASE or PULUMI_CONFIG_PASSPHRASE_FILE to remember):
Previewing update (dev):
     Type                               Name                                             Plan
 +   pulumi:pulumi:Stack                pulumi-backend-bootstrap-dev                     create
 +   ├─ aws:s3:Bucket                   pulumi-backend-state-bucket                      create
 +   ├─ aws:s3:BucketPublicAccessBlock  pulumi-backend-state-bucket-public-access-block  create
 +   └─ aws:kms:Key                     pulumi-secrets-provider-encryption-key           create

Outputs:
    PULUMI_BACKEND_URL          : output<string>
    PULUMI_SECRETS_PROVIDER     : output<string>
    Pulumi Backend Login Command: output<string>
    Pulumi Stack Init Command   : output<string>

Resources:
    + 4 to create

Do you want to perform this update? yes
Updating (dev):
     Type                               Name                                             Status
 +   pulumi:pulumi:Stack                pulumi-backend-bootstrap-dev                     created
 +   ├─ aws:s3:Bucket                   pulumi-backend-state-bucket                      created
 +   ├─ aws:kms:Key                     pulumi-secrets-provider-encryption-key           created
 +   └─ aws:s3:BucketPublicAccessBlock  pulumi-backend-state-bucket-public-access-block  created

Outputs:
    PULUMI_BACKEND_URL          : "s3://pulumi-backend-state-bucket-xxxx"
    PULUMI_SECRETS_PROVIDER     : "awskms:///xxxx-xxxx-xxxx-xxxx-xxxx"
    Pulumi Backend Login Command: "pulumi login s3://pulumi-backend-state-bucket-xxxx"
    Pulumi Stack Init Command   : "pulumi stack init --secrets-provider='awskms:///xxxx-xxxx-xxxx-xxxx-xxxx' <project-name>.<stack-name>"

Resources:
    + 4 created

Duration: 6s
Configure Pulumi to use self-managed backend
Note: when using a self-managed backend with multiple Pulumi projects / stacks, it’s a good practice to ensure that the stack names are unique and always namespaced with the project name: pulumi stack init <project-name>.<stack-name>. See this issue for more details.
# Specify the outputs from the previous command
export PULUMI_BACKEND_URL="<PULUMI_BACKEND_URL>"
export PULUMI_SECRETS_PROVIDER="<PULUMI_SECRETS_PROVIDER>"
pulumi stack init --secrets-provider="<PULUMI_SECRETS_PROVIDER>" <project-name>.<stack-name>
Viola! You can now use the S3 bucket as Pulumi’s backend, and the KMS key as Pulumi’s Secrets Provider.
The full source code for this post can be found on Github.